- Home ›
- Google AJAX Feed API入門 ›
- 複数フィードの取得 ›
- HERE
スタイルの設定
FeedControlを利用する場合、出力は自動的に行われるため細かい調整を行うことが出来ません。ただし、出力される各要素にはクラスが設定されておりデフォルトのスタイルが設定されていますが,、任意のスタイルで上書することで出力形式を変更することが可能です。
実際の例を元にどのような構造になっているのかを確認して見ます。
1.DRAW_MODE_LINEARの場合の構造
2.DRAW_MODE_TABBEDの場合の構造
3.デフォルトで設定されているスタイルシート
4.サンプル
下記は出力形式が DRAW_MODE_LINEAR に設定されており、2つのフィードからそれぞれ2つのエントリを取得して表示した場合に出力される構造です。
<div id="feed">
  <div class="gfc-control">
    <div class="gfc-resultsbox-visible">
      <div class="gfc-resultsRoot">
        フィード毎の出力部分
      </div>
      <div class="gfc-resultsRoot">
        フィード毎の出力部分
      </div>
    </div>
  </div>
</div>
ここで「feed」IDが付けられている<div>要素は draw メソッドで指定した出力先のDOMノードです。
フィード毎の出力は<div class="gfc-resultsRoot"></div>の中に出力されます。今回は2つのフィードを取得していますので2つ含まれて居ます。
ではフィード毎の詳細の構造を確認してみます。
<div class="gfc-resultsRoot">
  <div class="gfc-resultsHeader">
    <div class="gfc-title">フィードタイトル</div>
  </div>
  <div class="gfc-results">
    <div class="gfc-result">
      <div class="gf-result">
        <div class="gf-title">
        <a class="gf-title" href="リンク先" target="_self">エントリタイトル</a>
        </div>
        <div class="gf-author">作者</div>
        <div class="gf-spacer">-</div>
        <div class="gf-relativePublishedDate">日時</div>
        <div class="gf-snippet">エントリ概要</div>
      </div>
    </div>
  </div>
</div>
フィード毎にフィードのタイトルとエントリの詳細が含まれます。エントリはエントリ毎にタイトルと作者、日時、概要が含まれます。(取得するフィード毎に異なる可能性があります)。
下記は出力形式が DRAW_MODE_TABBED に設定されており、2つのフィードからそれぞれ2つのエントリを取得して表示した場合に出力される構造です。
<div id="feed">
  <div class="gfc-control">
    <div class="gfc-tabsArea">
      <div class="gfc-tabHeader gfc-tabhActive">アクティブタブ</div>
      <div class="gfc-tabHeader gfc-tabhInactive">非アクティブタブ</div>
    </div>
    <div class="gfc-resultsbox-visible">
      <div class="gfc-resultsRoot gfc-tabData gfc-tabdActive">
        アクティブフィード毎の出力部分
      </div>
      <div class="gfc-resultsRoot gfc-tabData gfc-tabdInactive">
        非アクティブフィード毎の出力部分
      </div>
    </div>
  </div>
</div>
ここで「feed」IDが付けられている<div>要素は draw メソッドで指定した出力先のDOMノードです。
DRAW_MODE_TABBEDの場合は、まずフィードを選択するタブが表示されます。アクティブになっているタブと非アクティブのタブ用の2つのクラスが用意されています。
フィード毎の出力は<div class="gfc-resultsRoot gfc-tabData gfc-tabdActive"></div>の中に出力されます。今回は2つのフィードをダウンロードしていますので2つ含まれて居ますが、アクティブになっているフィードと非アクティブのフィードではクラス名が異なっています。
ではフィード毎の詳細の構造を確認してみます。
<div class="gfc-resultsRoot gfc-tabData gfc-tabdActive">
  <div class="gfc-resultsHeader">
    <div class="gfc-title">フィードタイトル</div>
  </div>
  <div class="gfc-results">
    <div class="gfc-result">
      <div class="gf-result">
        <div class="gf-title">
        <a class="gf-title" href="リンク先" target="_self">エントリタイトル</a>
        </div>
        <div class="gf-author">作者</div>
        <div class="gf-spacer">-</div>
        <div class="gf-relativePublishedDate">日時</div>
        <div class="gf-snippet">エントリ概要</div>
      </div>
    </div>
    <div class="gfc-result">
      <div class="gf-result">
        <div class="gf-title">
        <a class="gf-title" href="リンク先" target="_self">エントリタイトル</a>
        </div>
        <div class="gf-author">作者</div>
        <div class="gf-spacer">-</div>
        <div class="gf-relativePublishedDate">日時</div>
        <div class="gf-snippet">エントリ概要</div>
      </div>
    </div>
  </div>
</div>
フィード毎にフィードのタイトルとエントリの詳細が含まれます。エントリはエントリ毎にタイトルと日時、概要が含まれます。(取得するフィード毎に異なる可能性があります)。
デフォルトで読み込まれるスタイルシートは「default.css」で設定されており次のようになっています。
/** google.feeds.FeedControl classes
 *  - very similar to .gsc-XXX from ajax search
 */

.gfc-resultsHeader {
  width: 100%;
  border-bottom: 1px solid #e9e9e9;
  margin-bottom : 4px;
  }

.gfc-resultsHeader .gfc-title{
  color: #676767;
  display: inline;
  }

.gfc-tabsArea {
  margin-top: 6px;
  }

.gfc-tabsAreaInvisible {
  display : none;
  }

.gfc-tabHeader {
  display: inline;
  cursor: pointer;
  padding-left: 6px;
  padding-right: 6px;
  margin-right: 2px;
  }

.gfc-tabHeader.gfc-tabhActive {
  border-left: 1px solid #e9e9e9;
  border-right: 1px solid #e9e9e9;
  border-top: 2px solid #ff9900;
  color: black;
  }

.gfc-tabHeader.gfc-tabhInactive {
  border-left: 1px solid #e9e9e9;
  border-right: 1px solid #e9e9e9;
  border-top: 2px solid #e9e9e9;
  background: #e9e9e9;
  color: #676767;
  }

.gfc-tabData.gfc-tabdActive {
  display: block;
  }

.gfc-tabData.gfc-tabdInactive {
  display: none;
  }

/* tab specific results header supression */
.gfc-tabData .gfc-resultsHeader .gfc-title {
  display: none;
  }

/* the results for each section
 * .gfc-resultsbox-{visible,invisible} : a complete-collection of results including headers
 * .gfc-results : the collection of results for a given feed
 * .gfc-result : a generic result within the control
 */
.gfc-resultsbox-visible {
  display : block;
  }

.gfc-resultsbox-invisible {
  display : none;
  }

.gfc-results {
  padding-bottom: .2em;
  }

.gfc-result {
  margin-bottom: .5em;
  }

.gfc-result .gf-title {
  height: 1.4em;
  overflow: hidden;
  }

.gf-result .gf-author,
.gf-result .gf-spacer,
.gf-result .gf-relativePublishedDate {
  color: #6f6f6f;
  display : inline;
  }

.gf-result .gf-spacer {
  margin-right : 3px;
  margin-left : 3px;
  }

/**
 * undo common generic table rules
 * that tend to impact branding
 */
table.gf-branding td,
table.gf-branding {
  margin: 0 0 0 0;
  padding: 0 0 0 0;
  border : none;
}

table.gf-branding {
  border-style : none;
  border-width : 0px;
  border-spacing : 0px 0px;
  width : 100%;
}

td.gf-branding-text {
  vertical-align : top;
}

td.gf-branding-text div.gf-branding-text {
  padding-bottom : 2px;
  text-align : right;
  color : #676767;
  font-size : 11px;
  margin-right : 2px;
}

td.gf-branding-img-noclear {
  width : 51px;
  vertical-align : bottom;
}

td.gf-branding-img {
  width : 65px;
  vertical-align : bottom;
}

table.gf-branding-vertical td.gf-branding-text div.gf-branding-text {
  margin-right : 0px;
  text-align : center;
}

table.gf-branding-vertical td.gf-branding-img-noclear {
  text-align : center;
}

div.gf-branding-img,
div.gf-branding-img-noclear,
img.gf-branding-img,
img.gf-branding-img-noclear {
  padding-top : 1px;
}

img.gf-branding-img,
img.gf-branding-img-noclear {
  margin : 0 0 0 0;
  padding-right : 0;
  padding-left : 0;
  padding-bottom : 0;
  border : none;
  display : inline;
}

a.gf-branding-clickable {
  cursor : pointer;
}
デフォルトで設定されているスタイルを変更したい場合は、Google AJAX Feed APIを読み込んでいるHTMLページ内で変更したい要素に対して新しいスタイルを記述して下さい。
それでは簡単なサンプルで試してみます。
<!DOCTYPE html PUBLIC "-//W3C//DTD XHTML 1.0 Transitional//EN"
 "http://www.w3.org/TR/xhtml1/DTD/xhtml1-transitional.dtd">
<html xmlns="http://www.w3.org/1999/xhtml" xml:lang="ja" lang="ja">
<head>
<meta http-equiv="Content-Type" content="text/html;charset=UTF-8">
<meta http-equiv="Content-Script-Type" content="text/javascript">
<title>Google AJAX Feed API テスト</title>

<style type="text/css">
#feed .gfc-control{
  font-size:10px;
  width:160px;
}
#feed .gfc-resultsHeader .gfc-title{
  font-size:16px;
  color:#ff0000;
}
</style>

<script type="text/javascript" src="https://www.google.com/jsapi"></script>
<script type="text/javascript" src="./js/script5_3.js"></script>

</head>
<body>

<p>Google AJAX Feed API テスト</p>
<div id="feed"></div>

</body>
</html>
google.load("feeds", "1");

function initialize() {
  var control = new google.feeds.FeedControl();
  var feedurl1 = "http://googlejapan.blogspot.com/atom.xml";
  var feedurl2 = "http://googleblog.blogspot.jp/atom.xml";

  control.addFeed(feedurl1, "Google Japan");
  control.addFeed(feedurl2, "Official Google Blog");

  control.draw(document.getElementById("feed"));
}

google.setOnLoadCallback(initialize);
上記を実際にブラウザ見てみると次のように表示されます。
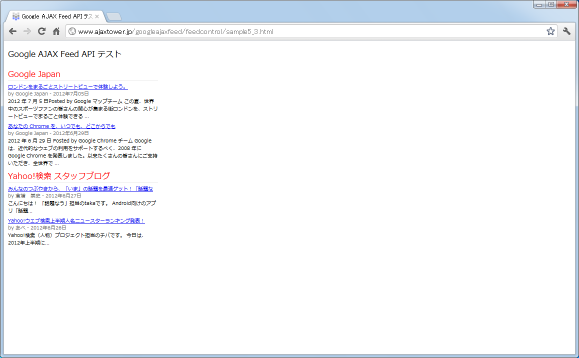
エントリ毎の幅などを変更しています。変更前と比較してみて下さい。
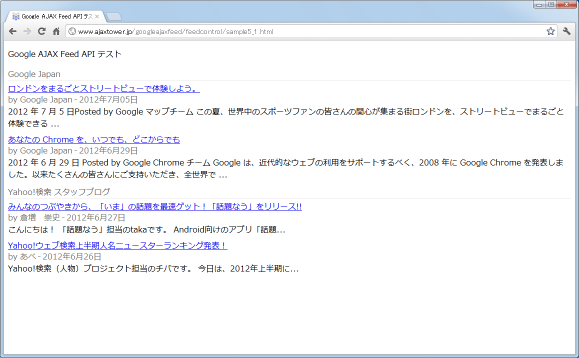
このようにスタイルシートを設定することで、フィードの出力される見た目を変更することが可能です。
( Written by Tatsuo Ikura )
